Cutting Rolled Goods
Setting up a Fusion Cut Station Interface
Zero Pick Functionality At Cut Station
Workstations designated as cut stations can take advantage of these options:
- Multiple allocations can be made from one roll (serial number)
- Inventory locations are automatically updated
- Access to multiple cut station functions from one menu
Cut Station Setup
There are a few simple settings that have to be made in order to take advantage of the cut station features.
- Must have location records setup for the Pre-cut, Post-cut, and Balance positions for the cutting station in the IWMS Location Master File. In the Location master, flag these three locations with the following location types:
- Pre-cut = P
- Post-cut = T
- Balance = B
- Zebra printer to print required labels for shipping serial tags.
- The workstation control panel (SET 1) must be setup as a cuts station by entering a C in the Work Station Type field on page 3 of the control panel settings.
- Configure the Cut Station. The minimal setup must designate the Pre-cut, Post-cut, and Balance locations. Other values are optional based on workflow.
- Set the Does Warhs Scan/Key Staging Locations field in the Warehouse Settings Table to enable scanning of staging areas. Refer to Cut Station Workflow for more information.
Refer to Locations File for more information on establishing locations.
Configuring the Cut Station
- From the main warehouse menu, enter WM2 8 to access the Cutting Station Defaults File Maintenance screen.
- To add a workstation, press F1. To update an existing cutting station, enter a U in the Opt column of the cutting station you want to change. Press Enter to access a screen that enables you to assign locations, decide when not to make a cut, and a level to scrap or ship the remaining inventory.
- Press F11 to proceed to the second screen.
- Press F11 to proceed to screen 3.
A workstation is designated as a cut station by entering a C in the Work Station Type field at the bottom of page three of the Workstation Control Panel File Maintenance Screen.
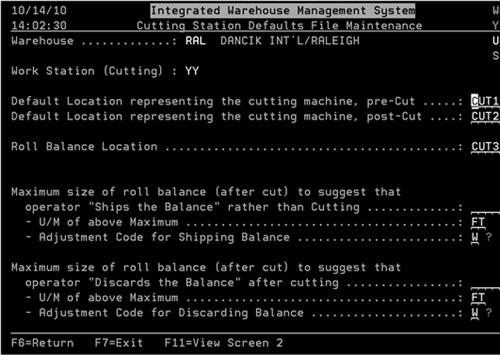
| Field | Description |
| Default Location representing the cutting machine, pre-Cut | This field assigns a location for the roll when it is placed into the hopper before it is cut. |
| Default Location representing the cutting machine, post-Cut | This location pertains to the cut piece that is going to be shipped to the customer. |
| Roll Balance Location | This is the location where the unused part of the roll is returned prior to going back to stock. |
| Maximum size of roll balance (after cut) to suggest that operator Ships the Balance rather than Cutting | This field sets the maximum amount of inventory left on the roll to avoid cutting it. For example, if this field is set to 5 FT and after cutting there would only be 4 feet left the system alerts you that the roll should not be cut. The correct settings here can save you cutting costs and time. If this field is left blank, this parameter is ignored. |
| U/M of above Maximum | The unit of measure used to calculate the maximum size roll balance. |
| Adjustment Code for Shipping Balance | This code reconciles the excess inventory that is being sent with the order. Some of the codes are system defined, but you can define as many new ones as you need. |
| Maximum size of roll balance (after cut) to suggest that operator Discards the Balance after cutting | If, after cutting, the balance of a roll falls under this entry the balance will be scrapped. If the balance is over this entry it will be returned to inventory. If this field is left blank, this parameter is ignored. |
| U/M of above Maximum | The unit of measure used to calculate the remainder of inventory left on the roll. |
| Adjustment Code for Discarding Balance |
This code tells the system the reason why the remaining inventory on the roll was discarded. The system then makes the necessary inventory adjustments. Some of the codes are system defined, but you can define as many new ones as you need. To display a listing of all the codes, enter a ? in the field and press Enter. |
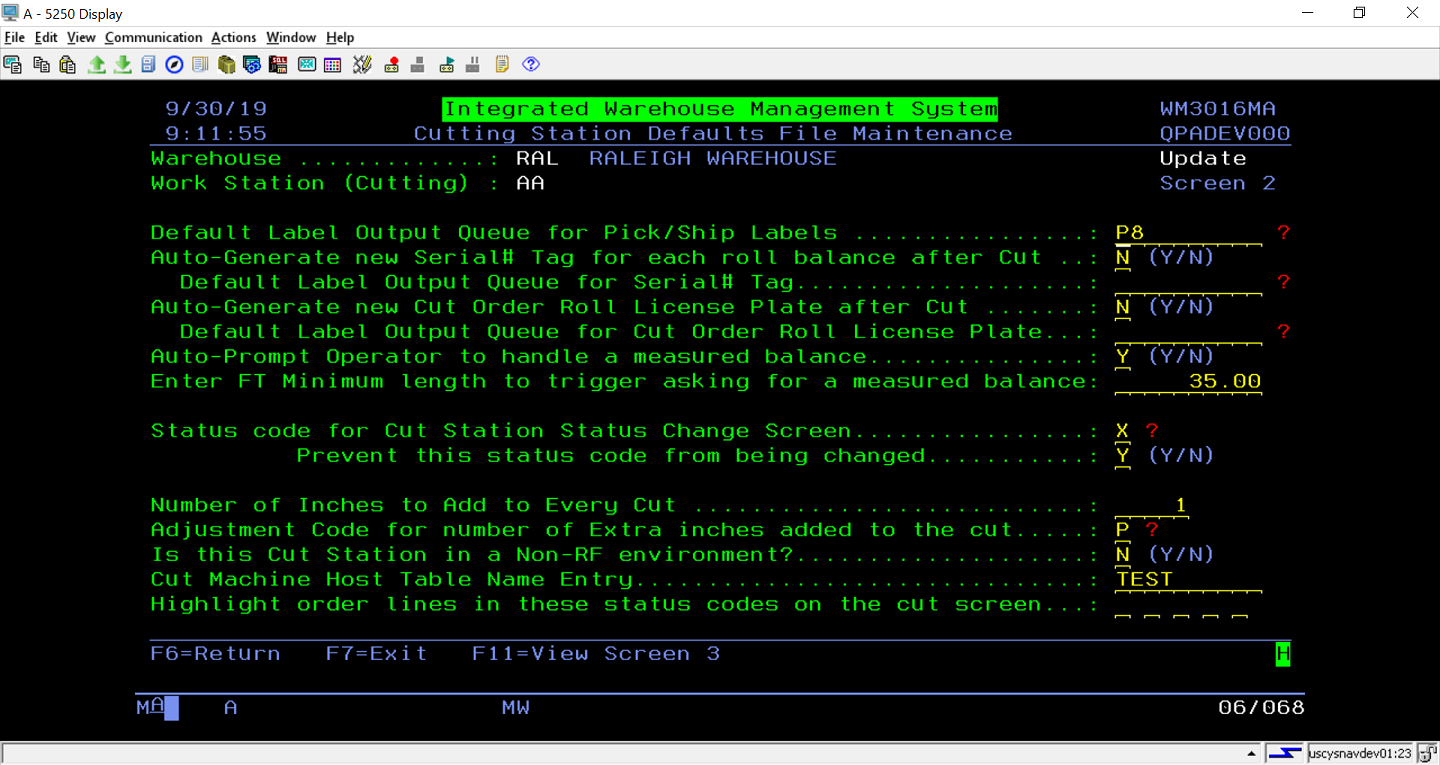
| Field | Description |
| Work Station (Cutting) | If you are adding a new cutting station enter its identifier here. If this is an existing cutting station that you are updating the current code is displayed. |
| Default Label Output Queue | This field allows you set a default printer for printer labels. |
| Auto-Generate new Serial# Tag for each roll balance after Cut | Flagging this option to Y directs the system to automatically create a new serial number tag for each roll after a cut is made. |
| Auto-Generate new Cut Order Roll License Plate after Cut | Flagging this option to Y directs the system to automatically create a new LPN for each roll after a cut is made. |
| Auto-Prompt Operator to handle a measured balance | Flagging this options with a Y directs the system to automatically perform the function after there are to be no more cuts made on a roll. |
| Enter FT Minimum length to trigger asking for a measured balance | If the quantity of a roll falls below the amount entered here the system prompts the operator to measure the remainder of the roll. |
|
Status code for Cut Station Status Change Screen Prevent this status code from being changed |
The default order status code for the order line being cut. Setting a default status code can prevent operator mistakes. Prevents an operator from changing the default status code. |
|
Number of Inches to Add to Every Cut Adjustment Code for number of Extra inches added to the cut |
Adds an additional set number of inches to every cut. You can use this to compensate for cutting machines that are out of calibration. |
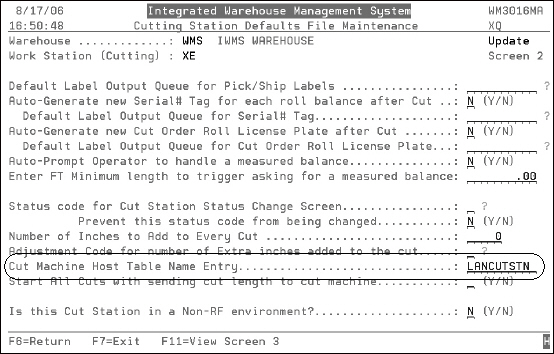
| Cut Machine Host Table Name Entry |
This is used if the cut station has been equipped with an electronic interface to pass the cut length from the order. This value is the name for the cut station in the WRKCFGTCP option which identifies the IP address of the cut station interface. |
| Start All Cuts with sending cut length to cut machine |
This field enhances the use of the cut stations that use cut machine interfaces that receive the length of the cut to be made for an order line. When the order line barcode is scanned, the length is sent electronically to an interface on the cutting machine, the type of interface varies by machine and is controlled in the system wide settings (SET 004). For more information on cutting interfaces, refer to Setting up a Fusion Cut Station Interface.
Activating this field, directs the system to start the cutting process by prompting for the order line. The order line is processed and the length is sent to the cut machine interface. The program then continues to ask for the badge, serial number, or whatever is required for the work station. If this field is not activated, the length isn't sent until the status code is entered, because there is no transmission of data from the workstation to the server until the screen has all the required fields populated. |
| Is this Cut Station in a Non-RF environment? | If this flag is set to Y, then the cut station is considered to be in a non-RF enable warehouse. The inventory is still moved the same as it would be in an RF enabled warehouse, however the application does it as the cut is made in the status update program. The balance is always moved back to the location that it was taken from, and allocated against prior to the cut. |
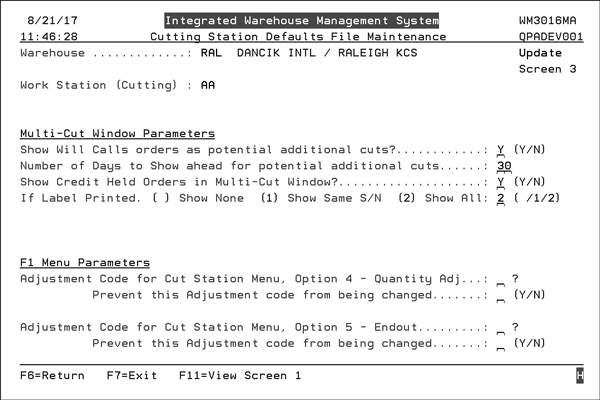
| Field | Description |
| Multi-Cut Window Parameters | |
| Show Will Calls orders as potential additional cuts? | Enter a Y to display will call orders in the multi-cut window. |
| Number of Days to Show ahead for potential additional cuts | Determines the number of days from the ship date that orders appear on the multi-cut station display. This setting provides you with more inventory control over multi-cut material at your cut station. |
| Show Credit Held Orders in Multi-Cut Window? | Enter a Y to show credit held orders on the multi-cut window. Letting the cut station operator see credit held orders allows for communication between the warehouse and the credit department to solve potential problems. For example, either the credit issue can be resolved or the ship date can be changed. |
|
If Label Printed. ( ) Show None (1) Show Same S/N (2) Show All |
Gives you more control over the orders that appear on the multi-cut display. The default is to not show orders that have already had labels printed, leaving the field blank. This can eliminate potential duplicate cuts for the same order. If a 1 is entered, only items with the same serial number as those printed on a label appear. Entering a 2 allows for all items that have a label printed to display at the multi-cut window. This option gives the operator control over what is cut. |
| F1 Menu Parameters | |
|
Adjustment Code for Cut Station Menu, Option 4 - Quantity Adj Prevent this Adjustment code from being changed |
Establishes a default status code for option 4 - Subtract Quantity from Roll Balance on the Cut Station Functions menu. Setting a default status code can prevent operator mistakes. Prevents an operator from changing the default status code |
|
Adjustment Code for Cut Station Menu, Option 5 - Endout Prevent this Adjustment code from being changed |
Establishes a default status code for option 5 - Write Off Balance on the Cut Station Functions menu. Setting a default status code can prevent operator mistakes. Prevents an operator from changing the default status code |
Cut Station Workflow
The following steps provide an example of how IWMS directs cut station procedures.
- The pick operator removes the roll from storage and places it on the input rack of the cut machine. They change the location of the roll and all allocated orders of the roll to the Pre-cut Location of the cut machine via option 12 - Change Loc Roll on the RF menu.
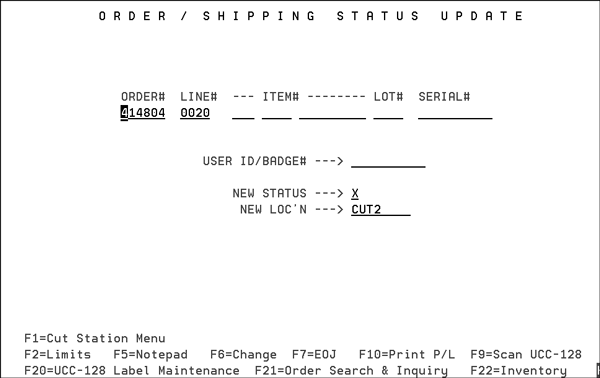
- After the roll has been delivered to the cut station and is ready to be cut, the operator scans the pick label. The required scans can vary depending on the control panel settings and cut station defaults. Examples of items to scan are: Order/Line and serial number of the roll.
- The scanned information gets transferred to the Status Change screen (option 5 on the Warehouse Menu).
- The system calculates how much inventory will be left on the roll after the cut is made.
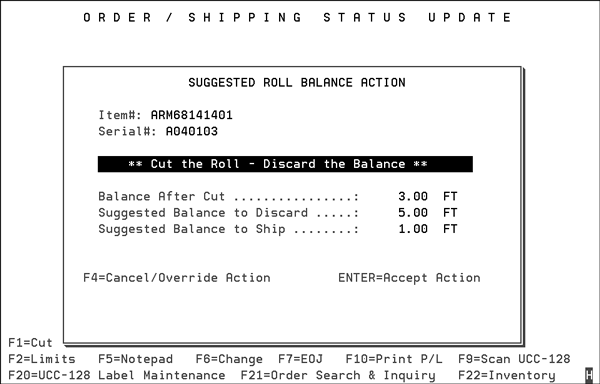
- If the remaining balance is less than the Discard the Balance or Ship the Balance quantities, the system alerts the operator that either the cut is not needed or the remaining balance on the roll needs to be scrapped after the cut.
- If the balance is greater than the quantity for either of the parameters, the system searches for other allocations to cut from the roll.
- If the Flexible Allocation module is active, all orders that are allocated for the same product, but not cut are presented as potential allocation swaps.
- If the Flexible Allocation module is not active, orders for the same serial number and location that are allocated but not cut are displayed for possible cutting.
- As each cut is made the allocation is moved to the Post Cut location.
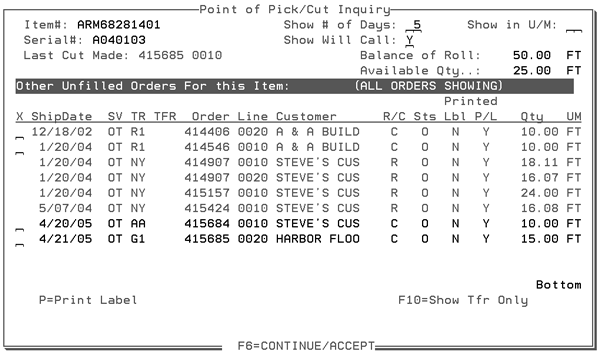
- Before any cuts are made, a screen appears that displays the additional orders that can be filled using the current roll.
- The top part of the screen lets you know the how much of material is going to be left after the first cut is made. The bottom section shows two orders that use the same product (ARM68141401).
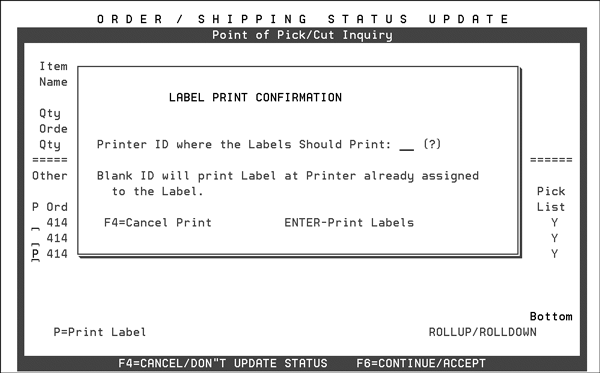
- If you want to cut the material for the second order, enter a P in the first column to the left of the order. This accesses a label printing screen. Enter the printer where you want the labels to print and press Enter.
- While the label is printing, press F6 to accept the first cut. A screen appears asking if you want to make any more cuts on this roll. Enter a Y or N.
- Make the first cut and attach the label. In this example, we will be entering a Y to print a label.
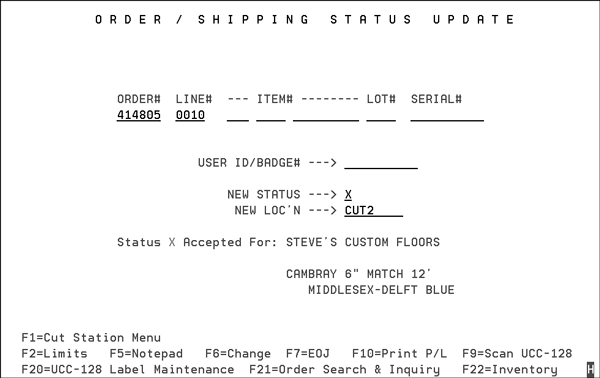
- If more cuts are needed, return to the Order /Shipping Status Update Screen. Update the screen with the new order's information by scanning the new label printed in step 7.
- Scan the label on the roll to make sure the roll matches the orders and to allocate the inventory and adjust the system.
- Press Enter. The next screen to appear recaps the inventory balance left on the roll and how much to discard and/or ship.
- Several cut station functions have been grouped together for easy access. They are available by pressing F1 on the Order/Shipping Status screen.
- Date of the transaction
- Warehouse were the roll is located
- Transaction type
- Customer involved
- Location of the roll
- Total quantity
- Amount On Hand
- Quantity available for use
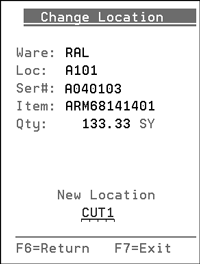
There are several things that happen at this point.
The Post Cut location is established using the Inventory Locations and Adjustments Screen.
| Option | Description |
| Roll History |
This option accesses a screen that displays all the activity on a roll. The information shown includes: |
| Print Serial# Label | Provides another way to print a label at the cutting station. |
| Make Measured Balance Adjustment | After several cuts the quantity left on a roll might need to be updated. This option provides the means to enter a measured result into the system. |
| Subtract Quantity from Roll Balance | This option allows you to keep track of your inventory by deleting out of the system the parts of a roll that are damaged or are deemed unusable. |
| Write Off Balance | Lets you enter an inventory adjustment code to write off the remainder of a roll that is not needed. It might be damaged, or there might not be enough left to restock. |
| Print Order Cut License Plate Label |
Presents you with a screen to enter an order and line number to include on a license plate label. You can also specify the printer. |
| Change Location of Rolls by Location | Lets you enter the old and new locations when you move a roll. |
| Zero Pick | This functionality allows cut station operators to zero pick rolled goods and to update the roll quantity when there is not enough inventory on the roll to fill the order. For more information click here. |
Setting up a Fusion Cut Station Interface
- The first step is to purchase the Lantronix MSS-100 Device Server. This can be done from this site:
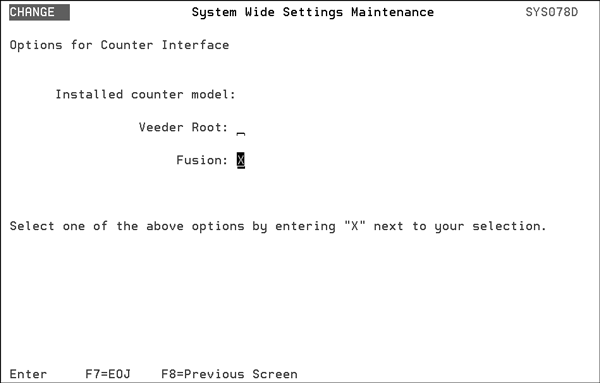
- The next step is to set the Cutting Machine Counter type in the Options for Cutting Machine Counter.
- Enter a password and scroll to the Options for Cutting Machine Counter and select it.
- On the screen that appears, select the Fusion Counter.
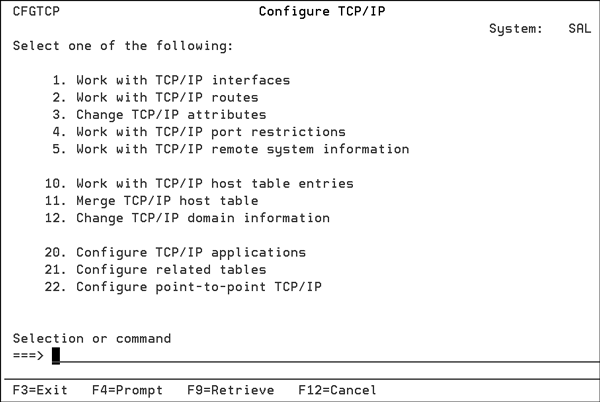
- The next step is to add the IP address of the Lantronix box to their TCP/IP Host Table. Enter GO CFGTCP on a command line to access the Configure TCP/IP screen.
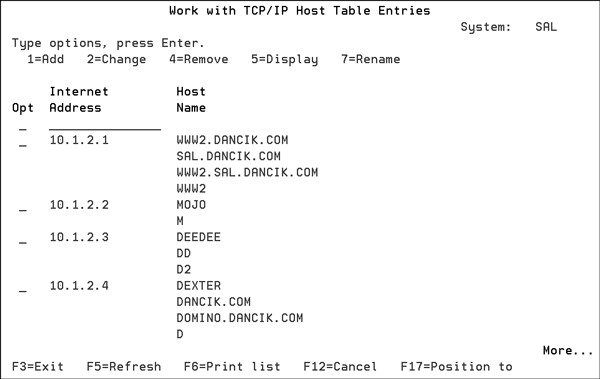
- Select option 10 - Work with TCP/IP host table entries.
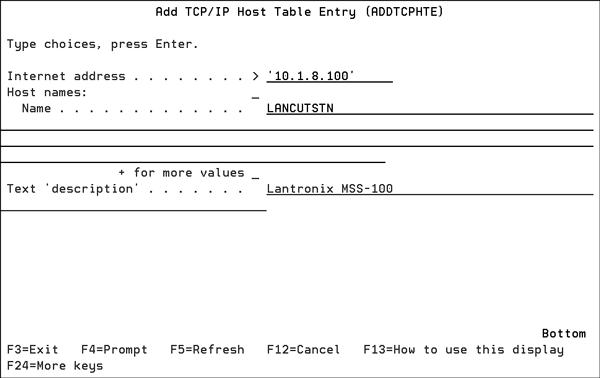
- Enter a 1 in the first Opt field to add a new entry. In this example the new entry was set to 10.1.8.100.
- Once they have this name set in the Host Table, they need to put the name into the field Cut Machine Host Table Name Entry on page two of the IWMS Cut Station Defaults screen (WM2 008).
- Now when they scan the status change at the cut station, it connects to the Lantronix and sends the length to the Fusion box.
http://www.lantronix.com/device-networking/external-device-servers/mss100.html
This MSS100 External Device Server acts as a link between the system and the counting device. The RJ45 connection (ethernet) is connected to the network, and the serial connection goes to the cut machine.
The length is sent when the status is updated.
Zero Pick Functionality At Cut Station
This functionality allows cut station operators to zero pick rolled goods and to update the roll quantity when there is not enough inventory on the roll to fill the order.
Associated Files
IWMS Event Triggers (WM8 20) - The event trigger ZEROPICK can be set-up to send an email to those affected whenever a zero pick occurs.
Warehouse Settings (WM2 1) - The second page of settings contains options related to zero picking.
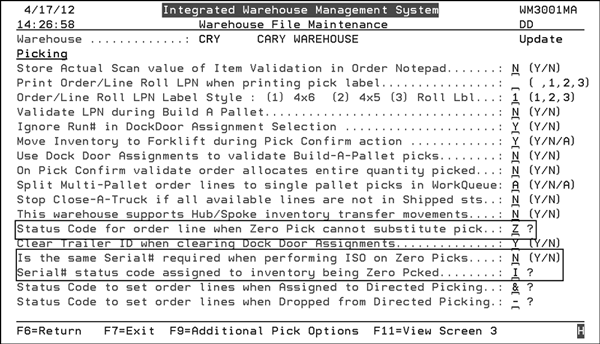
The setting Is the same Serial# required when performing ISO on Zero Picks is ignored when picking rolled goods. Rolled goods have unique serial numbers so ISO would never find the same serial number. However, by ignoring this setting for rolled goods, it can still be used for carton goods.
Making a Zero Pick at the Cut Station
Access the Oorder/Shipping Status Update screen (WAR 5).
Press F1 to access the Cutting Station Menu.
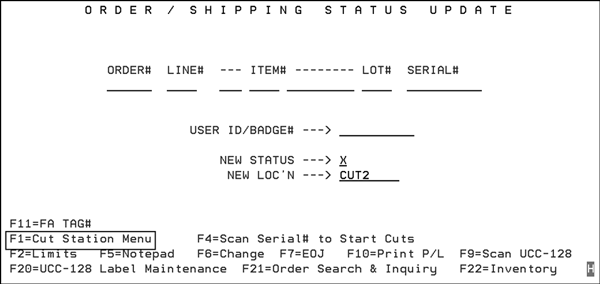
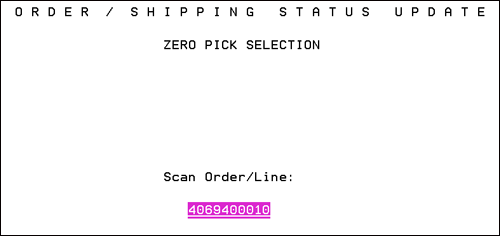
Scan the serial number and select option 8 on the Cutting Station Menu. The next screen asks the operator to scan the order and line number.
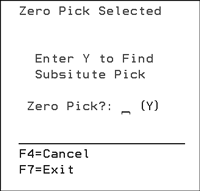
Since this functionality works at the serial number level, a Y should be entered in the next screen.
Press Enter on the next screen....
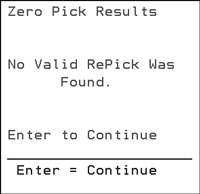
....to return to the Cut Station Menu.
Use option 3- Make Measured Balance Adjustment to correct the quantity of the roll.
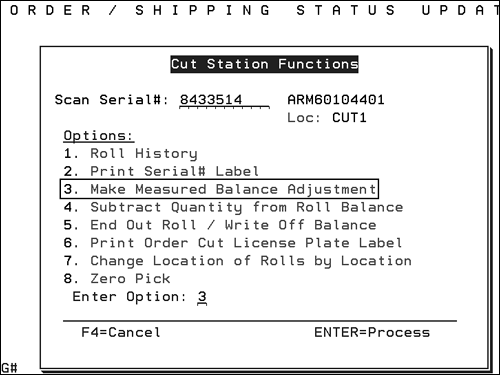
Enter the measured quantity.
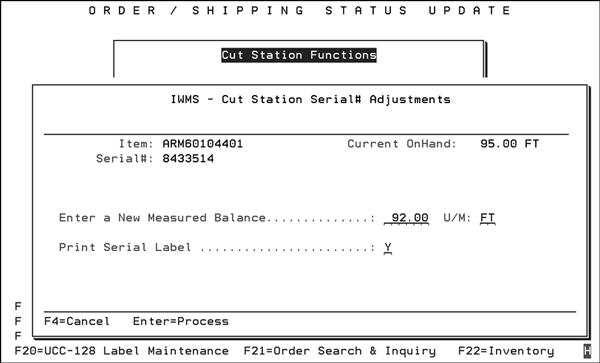
After the adjustment is made, the correct size of the roll is recorded, but the available inventory will show with a negative availability. This will be corrected when the customer service representative deallocates or reallocates the inventory to another serial number. This allows for the operator to make changes to the roll as needed.
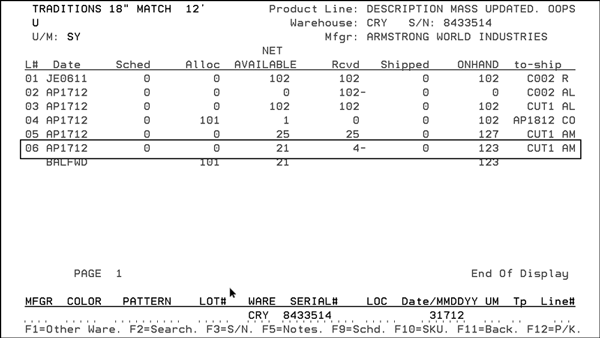
The status of the order is changed to the status entered in the Status Code for order line when Zero Pick cannot substitute pick on the Warehouse Settings menu (WM2 1).
